티스토리 뷰
안녕하세요
프로그래밍을 배우는 빛나는 샤트입니다.
1. VPN(Virtual Private Network)이란?


VPN은 뜻은 가상 사설망이며, 위 그림과 같이 가상의 망이 필요할 때 사용한다.
(개인적으로는) 흔히 해외 ip를 할당받아 국내ip로는 접근할 수 없는 웹사이트 방문을 하려고 하거나,
(업무적으로는) 사외에서 사내 네트워크에 접근하기 위해 사내 ip를 할당받기 위해서 사용한다.
VPN을 사용하는 이유는 아래와 같다.
① 익명성 보장
② 인증
③ 터널링: 패킷을 다른 패킷에 캡슐화해서 외부 인원이 읽기 어렵게 한다.
④ 암호화
2. 프로토콜 방식
PPTP
L2TP 및 L2TP/IPsec
OpenVPN
SSTP
IKEv2
| 프로토콜 | 장점 | 단점 |
| PPTP | 빠름 거의 모든 플랫폼에 클라이언트 내장 쉬운 설치 |
NSA의 위협을 받음 완전히 안전하지 않음 |
| L2TP 및 L2TP/IPsec | 일반적으로 안전한 것으로 간주 쉬운 설치 모든 현대 장치 및 운영 체체에서 사용 가능 |
OpenVPN보다 느림 NSA의 위협을 받을 수 있음 제한적인 방화벽과 함께 사용하면 문제 NSA가 의도적으로 프로토콜 약화시켰을 가능성 있음 |
| OpenVPN | 대부분 방화벽 우회가능 구성 용이 오픈 소스여서 쉽게 백도어 감지 가능 다양한 암호화 알고리즘과 호환 가능 매우 안전 |
조금 까다로울 수 있음 제3자 소프트웨어 필요 데스크톱 지원 훌륭하지만 모바일의 경우 개선 필요 |
| SSTP | 대부분 방화벽 우회 가능 암호에 따라 보안 수준 다르지만, 일반적으로 안전 Windows 운영 체제에 완전히 통함 Microsoft 지원 |
Microsoft의 독점 소유로 백도어 검사 불가 Windows 전용 플랫폼에서만 작동 |
| IKEv2 | 매우 안전 연결이 끊어지거나 네트워크 전환 후 다시 연결할 때 안정적 최소한 사용자 측에서 쉽게 설정 가능 L2TP, PPTP 및 SSTP보다 상대적으로 빠름 |
제한된 플랫폼에서 지원 SSTP 또는 OpenVPN과 같은 SSL 기반 솔루션과 비교할 때 사용되는 UDP 포트 500이 쉽게 차단 서버 구현 까다로움 |
출처 - VPN 프로토콜 비교: PPTP, L2TP, OpenVPN, SSTP, IKEv2
3. Ubuntu 18.04에 OpenVPN server 구축
Step1. Public ip 확인
Router의 Public ip 확인
$ wget -qO - icanhazip.com
OR
$ dig +short myip.opendns.com @resolver1.opendns.com
Step2. 설치 파일 다운로드 및 권한 변경
$ curl -O https://raw.githubusercontent.com/angristan/openvpn-install/master/openvpn-install.sh
$ chmod +x openvpn-install.sh
Step3. 설치
$ sudo bash openvpn-install.sh아래는 실행 화면이다.
Welcome to the OpenVPN installer!
The git repository is available at: https://github.com/angristan/openvpn-install

I need to ask you a few questions before starting the setup.
You can leave the default options and just press enter if you are ok with them.

I need to know the IPv4 address of the network interface you want OpenVPN listening to.
Unless your server is behind NAT, it should be your public IPv4 address.
IP address: 192.168.*.* # 개인 정보라 * 처리함

It seems this server is behind NAT. What is its public IPv4 address or hostname?
We need it for the clients to connect to the server.
Public IPv4 address or hostname: *.*.*.* # 개인 정보라 * 처리함

Checking for IPv6 connectivity...

Your host does not appear to have IPv6 connectivity.

Do you want to enable IPv6 support (NAT)? [y/n]: n

What port do you want OpenVPN to listen to?
   1) Default: 1194
   2) Custom
   3) Random [49152-65535]
Port choice [1-3]: 1

What protocol do you want OpenVPN to use?
UDP is faster. Unless it is not available, you shouldn't use TCP.
   1) UDP
   2) TCP
Protocol [1-2]: 1

What DNS resolvers do you want to use with the VPN?
   1) Current system resolvers (from /etc/resolv.conf)
   2) Self-hosted DNS Resolver (Unbound)
   3) Cloudflare (Anycast: worldwide)
   4) Quad9 (Anycast: worldwide)
   5) Quad9 uncensored (Anycast: worldwide)
   6) FDN (France)
   7) DNS.WATCH (Germany)
   8) OpenDNS (Anycast: worldwide)
   9) Google (Anycast: worldwide)
   10) Yandex Basic (Russia)
   11) AdGuard DNS (Anycast: worldwide)
   12) NextDNS (Anycast: worldwide)
   13) Custom
DNS [1-12]: 9

Do you want to use compression? It is not recommended since the VORACLE attack makes use of it.
Enable compression? [y/n]: n

Do you want to customize encryption settings?
Unless you know what you're doing, you should stick with the default parameters provided by the script.
Note that whatever you choose, all the choices presented in the script are safe. (Unlike OpenVPN's defaults)
See https://github.com/angristan/openvpn-install#security-and-encryption to learn more.

Customize encryption settings? [y/n]: n

Okay, that was all I needed. We are ready to setup your OpenVPN server now.
You will be able to generate a client at the end of the installation.
Press any key to continue...

(생략)

Tell me a name for the client.
The name must consist of alphanumeric character. It may also include an underscore or a dash.
Client name: client

Do you want to protect the configuration file with a password?
(e.g. encrypt the private key with a password)
   1) Add a passwordless client
   2) Use a password for the client
Select an option [1-2]: 2

(비밀번호 설정)

Note: using Easy-RSA configuration from: /etc/openvpn/easy-rsa/vars
Using SSL: openssl OpenSSL 1.1.1  11 Sep 2018
Generating an EC private key
writing new private key to '/etc/openvpn/easy-rsa/pki/easy-rsa-14599.2NBdkA/tmp.qm6XYB'
-----
Using configuration from /etc/openvpn/easy-rsa/pki/easy-rsa-14599.2NBdkA/tmp.WKlsKJ
Check that the request matches the signature
Signature ok
The Subject's Distinguished Name is as follows
commonName            :ASN.1 12:'client'
Certificate is to be certified until Jul  2 01:28:46 2024 GMT (825 days)

Write out database with 1 new entries
Data Base Updated

Client clientadded.

The configuration file has been written to /home/user/client.ovpn.
Download the .ovpn file and import it in your OpenVPN client.
Step4. VPN 동작/정지/상태 확인
# VPN 시작
$ sudo systemctl start openvpn
# VPN 정지
$ sudo systemctl stop status
# VPN 상태 확인
$ sudo systemctl status status
Step5. Port Forwarding
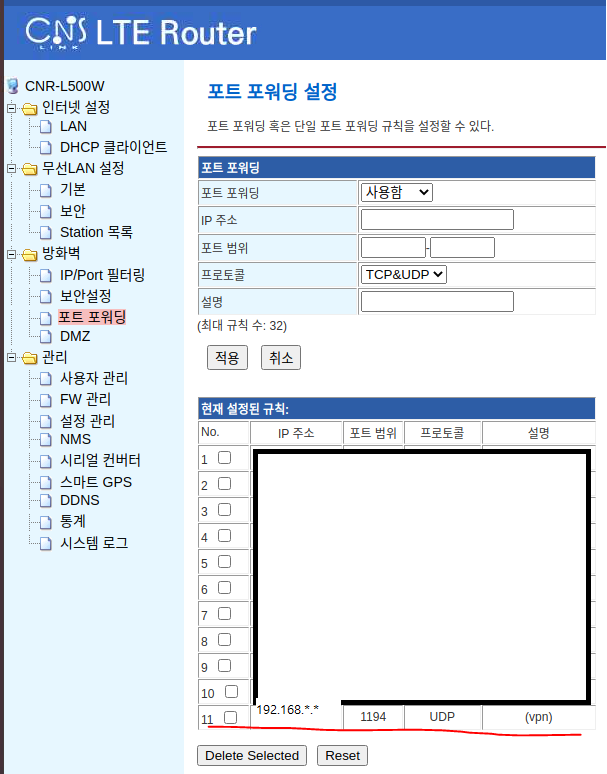
Router에서 포트포워딩을 해줘야 Client로 접속 가능하다.
VPN 서버 설치 중 1194 포트를 지정했다.
먼저 Router 설정 페이지 접속(대부분 192.168.0.1 로 접속 가능, ID: admin, PW: admin이 기본값)

위 그림처럼 Router 설정 페이지에서 포트 포워딩에 들어가서 규칙을 추가한다.
IP주소: 서버 PC의 사설ip(192.168.*.*과 같은 형태. 확인 방법은 $ifconfig)
포트범위: 1194 (서버 설치 시 지정한 포트번호를 적는다.)
프로토콜: UDP(서버 설치 시 UDP 지정함)
중요 - Server 설치 후 /home/user/client.ovpn 파일 생성되어 있음. 이 파일을 Client PC에 옮겨준다.
4. Windows에서 client 접속
Openvpn GUI 다운로드 에서 버전에 맞는 설치 파일 다운로드(여기에서는 Windows 64-bit MSI installer 사용)
설치 과정은 생략
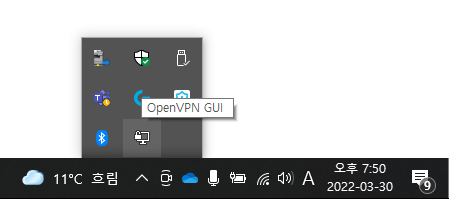
설치가 끝나면 Windows 작업표시줄에서 확인 가능

<실행 방법>
① 우클릭 - import - 파일불러오기(client.ovpn 선택)
② 우클릭 - songpa-tanchan - 연결

위와 같이 초록색으로 아이콘이 변경되고 VPN 접속 성공!
피드백은 언제나 환영입니다.😊
틀린 부분 있다면 지적해주시고 도움이 되었다면 댓글과 공감 눌러주세요
'Computer Science' 카테고리의 다른 글
| [CS]코드 변수 네이밍 규칙 (2) | 2022.02.24 |
|---|---|
| Timestamp (0) | 2022.01.17 |
- Total
- Today
- Yesterday
- 모두의연구소
- SLAM강의
- 멘탈관리
- AIFFEL후기
- 양정연SLAM
- 도전
- 실내자율주행
- 자율주행기술
- IT
- 인공지능교육
- 자율주행로봇
- 광주AI
- 대전 인공지능
- Slam
- AIFFEL인공지능과정
- 서빙로봇
- 인공지능
- 광주
- Python
- 아이펠
- ros
- SLAM공부
- 모두의 연구소
- AIFFEL교육
- 인공지능 교육
- 배달로봇
- 멋쟁이사자처럼
- 해커톤
- 광주인공지능사관학교
- AIFFEL
| 일 | 월 | 화 | 수 | 목 | 금 | 토 |
|---|---|---|---|---|---|---|
| 1 | 2 | 3 | 4 | 5 | 6 | 7 |
| 8 | 9 | 10 | 11 | 12 | 13 | 14 |
| 15 | 16 | 17 | 18 | 19 | 20 | 21 |
| 22 | 23 | 24 | 25 | 26 | 27 | 28 |
